October 25/2023
How to Test a Well Pressure Switch
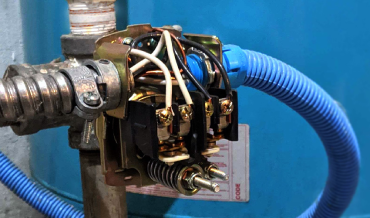
A well pressure switch is an essential component of a well water system. It’s responsible for monitoring the pressure within the water tank and controlling the operation of the well pump. In other words, a well pressure switch maintains the desired water pressure in your home’s plumbing system by controlling when the pump turns on and off.
Just like the other parts of your well water system, the well pressure switch can malfunction for a number of reasons, including normal wear and tear, electrical problems, and more. A failing well pressure switch can lead to various issues, such as inconsistent water pressure, no water supply, energy inefficiency, frequent pump cycling, and many more. If you have a well water system in your home, it’s important to know how to test the well pressure switch and perform simple troubleshooting steps to ensure the switch continues to operate smoothly. In this guide, Mr. Rooter Plumbing outlines the basic steps to help you test and troubleshoot your well pressure switch.
Step 1: Turn Off the Power Supply to the Well Pump
For safety, the first step is to ensure the power supply to the well pump is turned off. You can do this by either switching off the circuit breaker or disconnecting the pump from its power source.
Step 2: Check If the Switch Has Any Pressure Adjustment Settings
Inspect the pressure switch for any pressure adjustment settings. If present, make sure they are correctly set according to your system's requirements.
Step 3: Use a Pressure Gauge to Measure the Current Water Pressure in the Tank
Attach a pressure gauge to a faucet or hose bib to measure the current water pressure in the tank. Compare this reading to your system's cut-in and cut-out pressure settings.
Step 4: Manually Test the Pressure Switch
If you suspect an issue with the switch, you can manually test it. Gently turn the adjustment nut on the pressure switch counterclockwise. The pressure should drop below the cut-in setting, causing the pump to start. Then, turn the nut clockwise to raise the pressure above the cut-out setting, which should stop the pump.
Step 5: Carefully Observe the Pressure Switch's Response
While manually testing, pay close attention to how the pressure switch responds. If it fails to start or stop the pump at the correct pressure, it might be malfunctioning.
Step 6: Consult a Nearby Plumber
If you're not comfortable with this process or if the switch isn't behaving as expected, it's time to call in a nearby plumber. They'll ensure your well pressure switch is working correctly, which is essential for a reliable water supply.
To prevent pressure switch malfunctions, it's important to conduct regular maintenance, keep the switch and its housing dry, and address any issues promptly. Regular inspections and professional servicing can help identify and resolve problems before they lead to a complete malfunction.
Is Your Well Pressure Switch Acting Up? Call Mr. Rooter Plumbing Today
Have you noticed fluctuations in water pressure? Is your well pump cycling on and off more frequently than usual? Does the switch produce loud clicking or thumping sounds each time it turns the pump on or off? These are signs that you need to reach out to a professional plumbing service to inspect your well pressure switch and resolve the issues. Here at Mr. Rooter Plumbing, we can help you repair or replace a failing well pressure switch. Our affordable plumbers have the expertise and experience to fix all kinds of well pressure switch issues.

